安裝
最簡單方式
- 使用 QEMU + KVM 去執行,在 Ubuntu 20.04 下安裝時使用下面指令啟動:
- 備註:如果無法正常執行,請把
-cpu的參數改為Skylake-Server(因為有些 CPU 指令集如ssse3會需要用到,筆者電腦的 CPU 剛好有支援就直接做 passthrough
- 備註:如果無法正常執行,請把
sudo qemu-system-x86_64 -smp 6 -cpu host \
-m 4g -vga virtio -hda ubuntu20.04.qcow2 \
-nic user,model=virtio \
-nic tap,model=e1000 \
-nic tap,model=e1000 \
-accel kvm
- 之後照著本篇文章後面的
bootstrap.sh執行(VirtualBox 那段) - 使用
lspci -vvx查看 PCI device ID,並填入~/.bashrc中的ONVM_NIC_PCI - 到
openNetVM/scripts/下執行./setup_environment.sh- 應該要看到網卡綁定到 DPDK,而不是顯示在 kernel
- 這時候 DPDK 就設定好了
- 這步驟每次重開機都要做!
- 測試 DPDK helloworld
- 到
dpdk/examples/helloworld下執行sudo ./build/helloworld -l 0,1 -n 1
- 到
- 測試 openNetVM 程式(會用到 RSS)
- 下面兩個程式分別需要開兩個終端機
- 到
openNetVM/下執行./onvm/go.sh -k 1 -n 0xF8 -s stdout - 到
examples/speed_tester下執行./go.sh 1 -d 1 -c 16000
沒事別用 VirtualBox + Intel 虛擬網卡去跑,非常慢,就算用了 KVM 當作 paravirtprovider 還是慢,一秒鐘的 helloworld 需要跑到 4 分鐘。不過用 virtio 就沒問題,但是不支援 RSS。
踩雷過程
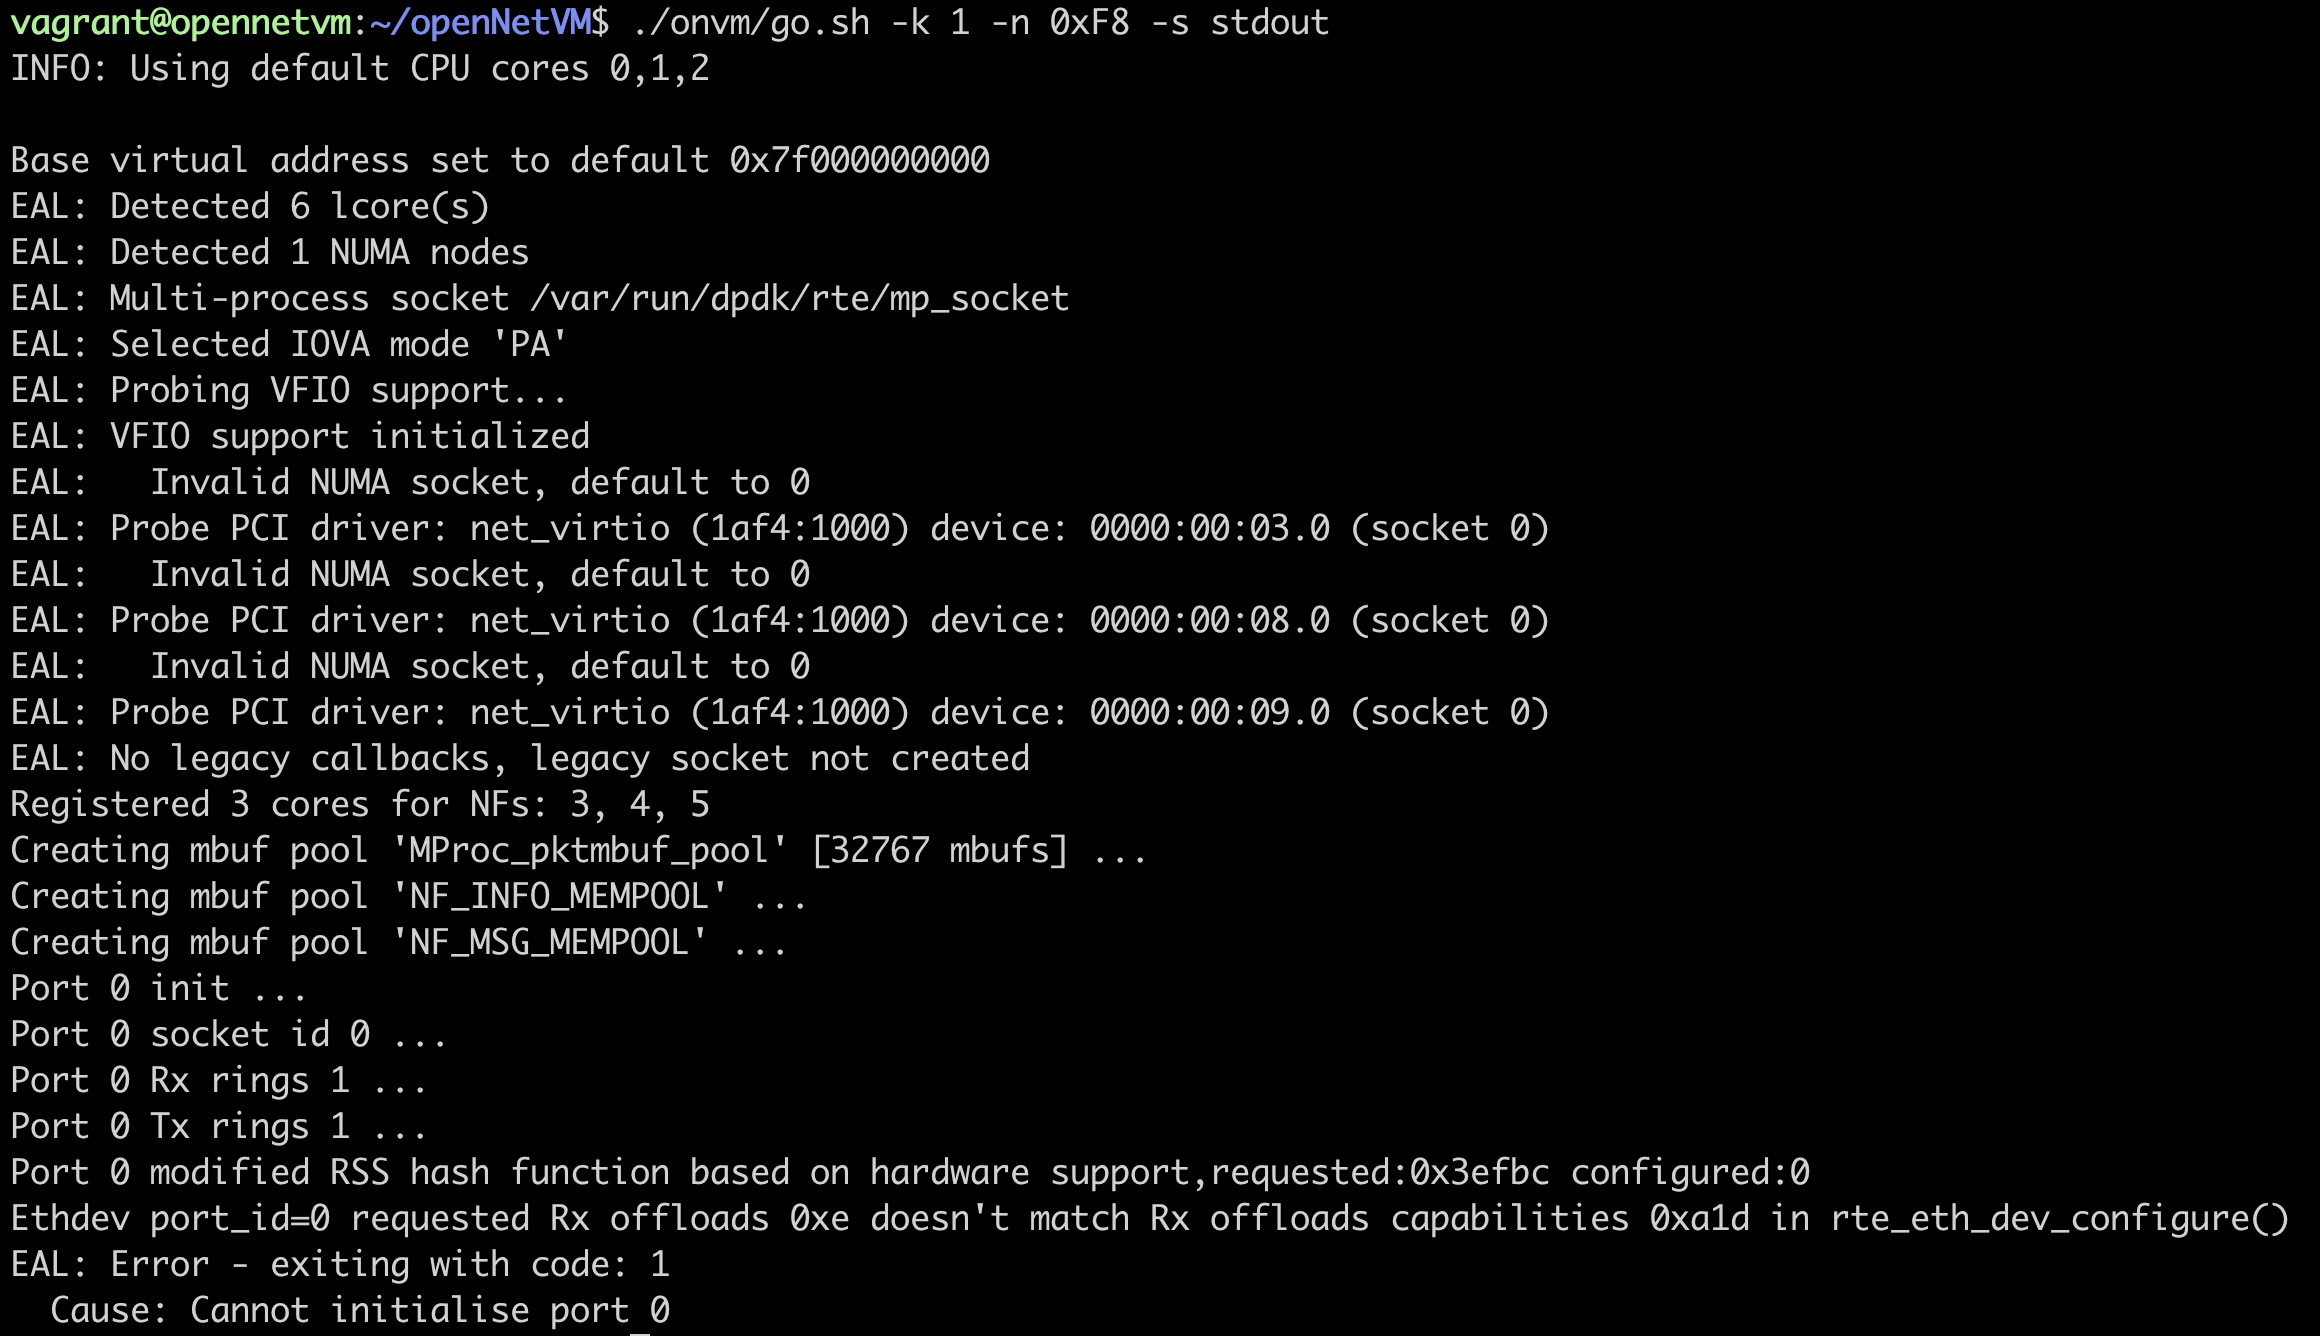
因為 DPDK 支援的網卡關係,雖然 virtio 可以成功執行 DPDK 的 helloworld 程式,但是 openNetVM 的範例程式需要用到 RSS 因此就會顯示不支援,如下圖:
VirtualBox 版本
注意,這個非常慢!
提供以下 Vagrantifile 方便安裝:
注意,請自行修改 cpus, memory
# -*- mode: ruby -*-
# vi: set ft=ruby :
[
  { :name => "vagrant-reload", :version => ">= 0.0.1" },
  { :name => "vagrant-cachier", :version => ">= 1.2.1"}
].each do |plugin|

  if not Vagrant.has_plugin?(plugin[:name], plugin[:version])
    raise "#{plugin[:name]} #{plugin[:version]} is required. " \
          "Please run `vagrant plugin install #{plugin[:name]}`"
  end
end

Vagrant.configure("2") do |config|
  config.vm.box = "bento/ubuntu-20.04"
  config.vm.hostname = "opennetvm"

  if Vagrant.has_plugin?("vagrant-cachier")
    config.cache.scope = "machine"
  end

  config.vm.provision :shell, path: "bootstrap.sh", privileged: false
  config.vm.provision :reload

  config.vm.provider "virtualbox" do |vb|
    # Uncomment below if necessary.
    # vb.gui = true
    vb.name = "OpenNetVM Server"

    # Customize below. At least two or more vCPUs are recommended.
    vb.cpus = 6
    vb.memory = 4096

    vb.customize ["modifyvm", :id, "--nic1", "nat"]
    vb.customize ["modifyvm", :id, "--nic2", "natnetwork"]
    vb.customize ["modifyvm", :id, "--nic3", "natnetwork"]
    vb.customize ["modifyvm", :id, "--nictype1", "virtio"]
    vb.customize ["modifyvm", :id, "--nictype2", "82545EM"]
    vb.customize ["modifyvm", :id, "--nictype3", "82545EM"]
    vb.customize ["modifyvm", :id, "--nicpromisc2", "allow-all"]
    vb.customize ["modifyvm", :id, "--nicpromisc3", "allow-all"]
    vb.customize ["modifyvm", :id, "--nat-network2", "onv"]
    vb.customize ["modifyvm", :id, "--nat-network3", "onv"]

    # without this, spinlock and rdtsc can be significantly slower...
    vb.customize ["modifyvm", :id, "--paravirtprovider", "kvm"]
  end
end
bootstrap.sh
sudo apt-get update
sudo apt-get install -y build-essential linux-headers-$(uname -r) git bc
sudo apt-get install -y python3 python
sudo apt-get install -y libnuma-dev
sudo apt-get install -y gcc make pkg-config

# Setup repo
git clone https://github.com/sdnfv/openNetVM
cd openNetVM
git checkout master

git submodule sync
git submodule update --init

echo export ONVM_HOME=$(pwd) >> ~/.bashrc
echo export ONVM_HOME=$(pwd) >> ~vagrant/.bashrc

export ONVM_HOME=$(pwd) >> ~/.bashrc
export ONVM_HOME=$(pwd) >> ~vagrant/.bashrc

cd dpdk
echo export RTE_SDK=$(pwd) >> ~/.bashrc
echo export RTE_TARGET=x86_64-native-linuxapp-gcc  >> ~/.bashrc
echo export ONVM_NUM_HUGEPAGES=1024 >> ~/.bashrc
echo export ONVM_NIC_PCI=\" 00:08.0 00:09.0 \" >> ~/.bashrc

export RTE_SDK=$(pwd) >> ~/.bashrc
export RTE_TARGET=x86_64-native-linuxapp-gcc  >> ~/.bashrc
export ONVM_NUM_HUGEPAGES=1024 >> ~/.bashrc
export ONVM_NIC_PCI=" 00:08.0 00:09.0 " >> ~/.bashrc

sudo sh -c "echo 0 > /proc/sys/kernel/randomize_va_space"

# Configure & compile DPDK
cd $ONVM_HOME/scripts
./install.sh

# Run DPDK HelloWorld Application
cd $ONVM_HOME/dpdk/examples/helloworld
make
#sudo ./build/helloworld -l 0,1 -n 1

# Make and test openNetVM
cd $ONVM_HOME/onvm
make
cd ..
QEMU + KVM
注意,目前 Vagrant libvirt 還在實驗階段,因此網卡設定有問題,無法正常使用,且 Vagrantfile 更新不會同步到虛擬機!因此此版本無法使用,單純記錄一下設定檔
Vagrantfile
# -*- mode: ruby -*-
# vi: set ft=ruby :
[
  { :name => "vagrant-reload", :version => ">= 0.0.1" },
  { :name => "vagrant-cachier", :version => ">= 1.2.1"}
].each do |plugin|

  if not Vagrant.has_plugin?(plugin[:name], plugin[:version])
    raise "#{plugin[:name]} #{plugin[:version]} is required. " \
          "Please run `vagrant plugin install #{plugin[:name]}`"
  end
end

Vagrant.configure("2") do |config|

  if Vagrant.has_plugin?("vagrant-cachier")
    config.cache.scope = "machine"
  end

  config.vm.provision :shell, path: "bootstrap.sh", privileged: false
#  config.vm.provision :reload

  config.vm.provider "libvirt" do |libvirt|
    # vb.gui = true

    libvirt.cpus = 6
    libvirt.memory = 4096

    libvirt.cpu_model = "Skylake-Server"
    libvirt.video_type = "virtio"

    libvirt.qemuargs :value => "-accel"
    libvirt.qemuargs :value => "kvm"

    #libvirt.qemuargs :value => "-nic"
    #libvirt.qemuargs :value => "tap,model=e1000"
  end

  config.vm.define "onvm" do |onvm|
    onvm.vm.box = "generic/ubuntu2004"
    onvm.vm.hostname = "opennetvm"
    onvm.vm.network :private_network,
      :nic_model_type => "e1000",
      :ip => "192.168.1.2"
  end
end
bootstrap.sh
sudo sed -i 's/nameserver .*/nameserver 1.1.1.1/' /etc/resolv.conf
sudo sed -i 's/us.archive.ubuntu.com/ftp.ubuntu-tw.net/g' /etc/apt/sources.list
sudo apt-get update
sudo apt-get install -y build-essential linux-headers-$(uname -r) git bc
sudo apt-get install -y python3 python
sudo apt-get update
sudo apt-get install -y libnuma-dev
sudo apt-get install -y gcc make pkg-config

# Setup repo
git clone https://github.com/sdnfv/openNetVM
cd openNetVM
git checkout master

git submodule sync
git submodule update --init

echo export ONVM_HOME=$(pwd) >> ~/.bashrc
echo export ONVM_HOME=$(pwd) >> ~vagrant/.bashrc

export ONVM_HOME=$(pwd) >> ~/.bashrc
export ONVM_HOME=$(pwd) >> ~vagrant/.bashrc

cd dpdk
echo export RTE_SDK=$(pwd) >> ~/.bashrc
echo export RTE_TARGET=x86_64-native-linuxapp-gcc  >> ~/.bashrc
echo export ONVM_NUM_HUGEPAGES=1024 >> ~/.bashrc
echo export ONVM_NIC_PCI=\" 00:06.0 00:07.0 \" >> ~/.bashrc

export RTE_SDK=$(pwd) >> ~/.bashrc
export RTE_TARGET=x86_64-native-linuxapp-gcc  >> ~/.bashrc
export ONVM_NUM_HUGEPAGES=1024 >> ~/.bashrc
export ONVM_NIC_PCI=" 00:06.0 00:07.0 " >> ~/.bashrc

sudo sh -c "echo 0 > /proc/sys/kernel/randomize_va_space"

# Configure & compile DPDK
cd $ONVM_HOME/scripts
./install.sh

# Run DPDK HelloWorld Application
cd $ONVM_HOME/dpdk/examples/helloworld
make
#sudo ./build/helloworld -l 0,1 -n 1

# Make and test openNetVM
cd $ONVM_HOME/onvm
make
cd ..
社群資源
疑難排解
igb_uio.ko 錯誤
發生在執行 setup_environment.sh 的時候,錯誤訊息如下:
**jackkuo@jackkuo-Standard-PC:**~/openNetVM/dpdk$ ./setup_environment.sh
Setting up hugepages
Removing currently reserved hugepages
Unmounting /mnt/huge and removing directory
Reserving hugepages
Creating /mnt/huge and mounting as hugetlbfs
Huge pages successfully configured
Loading uio kernel modules
insmod: ERROR: could not insert module igb_uio.ko: Invalid module format
發生原因:在編譯完 DPDK 後有更新 Kernel(系統更新時)
快速解法:刪除 DPDK 目錄,重新下載、編譯。
rm -rf dpdk
git submodule sync
git submodule update --init
cd scripts
./install.sh
DPDK 環境建立失敗
如果沒有成功,會看到所有網卡都是使用 kernel driver
**jackkuo@jackkuo:**~/openNetVM/scripts$ ./setup_environment.sh
.
.
.
Network devices using kernel driver
===================================
0000:00:03.0 'Virtio network device 1000' if=ens3 drv=virtio-pci unused=igb_uio,vfio-pci *Active*
0000:00:04.0 '82540EM Gigabit Ethernet Controller 100e' if=ens4 drv=e1000 unused=igb_uio,vfio-pci *Active*
0000:00:05.0 '82540EM Gigabit Ethernet Controller 100e' if=ens5 drv=e1000 unused=igb_uio,vfio-pci *Active*
首先檢查網卡介面是否為關閉狀態,下圖顯示 ens4 與 ens5 都是啟用且有綁定 IP 位址:
**jackkuo@jackkuo:**~/$ ip a
1: lo: <LOOPBACK,UP,LOWER_UP> mtu 65536 qdisc noqueue state UNKNOWN group default qlen 1000
    link/loopback 00:00:00:00:00:00 brd 00:00:00:00:00:00
    inet 127.0.0.1/8 scope host lo
       valid_lft forever preferred_lft forever
    inet6 ::1/128 scope host
       valid_lft forever preferred_lft forever
2: ens3: <BROADCAST,MULTICAST,UP,LOWER_UP> mtu 1500 qdisc fq_codel state UP group default qlen 1000
    link/ether 52:54:00:12:34:56 brd ff:ff:ff:ff:ff:ff
    inet 10.0.2.15/24 brd 10.0.2.255 scope global dynamic noprefixroute ens3
       valid_lft 86201sec preferred_lft 86201sec
    inet6 fec0::dd7a:c17c:d49c:3362/64 scope site temporary dynamic
       valid_lft 86390sec preferred_lft 14390sec
    inet6 fec0::299c:581:31a0:ca20/64 scope site dynamic mngtmpaddr noprefixroute
       valid_lft 86390sec preferred_lft 14390sec
    inet6 fe80::65dc:41bc:69a9:a976/64 scope link noprefixroute
       valid_lft forever preferred_lft forever
3: ens4: <BROADCAST,MULTICAST,UP,LOWER_UP> mtu 1500 qdisc fq_codel state UP group default qlen 1000
    link/ether 52:54:00:12:34:57 brd ff:ff:ff:ff:ff:ff
    inet 192.168.1.77/16 brd 192.168.255.255 scope global dynamic noprefixroute ens4
       valid_lft 86201sec preferred_lft 86201sec
    inet6 fe80::bd50:873f:7926:5fe9/64 scope link noprefixroute
       valid_lft forever preferred_lft forever
4: ens5: <BROADCAST,MULTICAST,UP,LOWER_UP> mtu 1500 qdisc fq_codel state UP group default qlen 1000
    link/ether 52:54:00:12:34:58 brd ff:ff:ff:ff:ff:ff
    inet 192.168.1.78/16 brd 192.168.255.255 scope global dynamic noprefixroute ens5
       valid_lft 86201sec preferred_lft 86201sec
    inet6 fe80::e739:7b24:3cf0:4b35/64 scope link noprefixroute
       valid_lft forever preferred_lft forever
將這兩張網卡關閉:
sudo ip link set ens4 down
sudo ip link set ens5 down
重新設定:(成功顯示 DPDK-compatible driver)
**jackkuo@jackkuo:**~/openNetVM/scripts$ ./setup_environment.sh
Setting up hugepages
Removing currently reserved hugepages
Unmounting /mnt/huge and removing directory
Reserving hugepages
Creating /mnt/huge and mounting as hugetlbfs
Huge pages successfully configured
igb_uio 20480 0 - Live 0x0000000000000000 (OE)
IGB UIO module already loaded.
Checking NIC status

Network devices using kernel driver
===================================
0000:00:03.0 'Virtio network device 1000' if=ens3 drv=virtio-pci unused=igb_uio,vfio-pci *Active*
0000:00:04.0 '82540EM Gigabit Ethernet Controller 100e' if=ens4 drv=e1000 unused=igb_uio,vfio-pci
0000:00:05.0 '82540EM Gigabit Ethernet Controller 100e' if=ens5 drv=e1000 unused=igb_uio,vfio-pci

.
.
.
===================================
Binding NIC status
Binding 00:04.0 to DPDK
Binding 00:05.0 to DPDK
Finished Binding

Network devices using DPDK-compatible driver
============================================
0000:00:04.0 '82540EM Gigabit Ethernet Controller 100e' drv=igb_uio unused=e1000,vfio-pci
0000:00:05.0 '82540EM Gigabit Ethernet Controller 100e' drv=igb_uio unused=e1000,vfio-pci

Network devices using kernel driver
===================================
0000:00:03.0 'Virtio network device 1000' if=ens3 drv=virtio-pci unused=igb_uio,vfio-pci *Active*
KVM 衝突
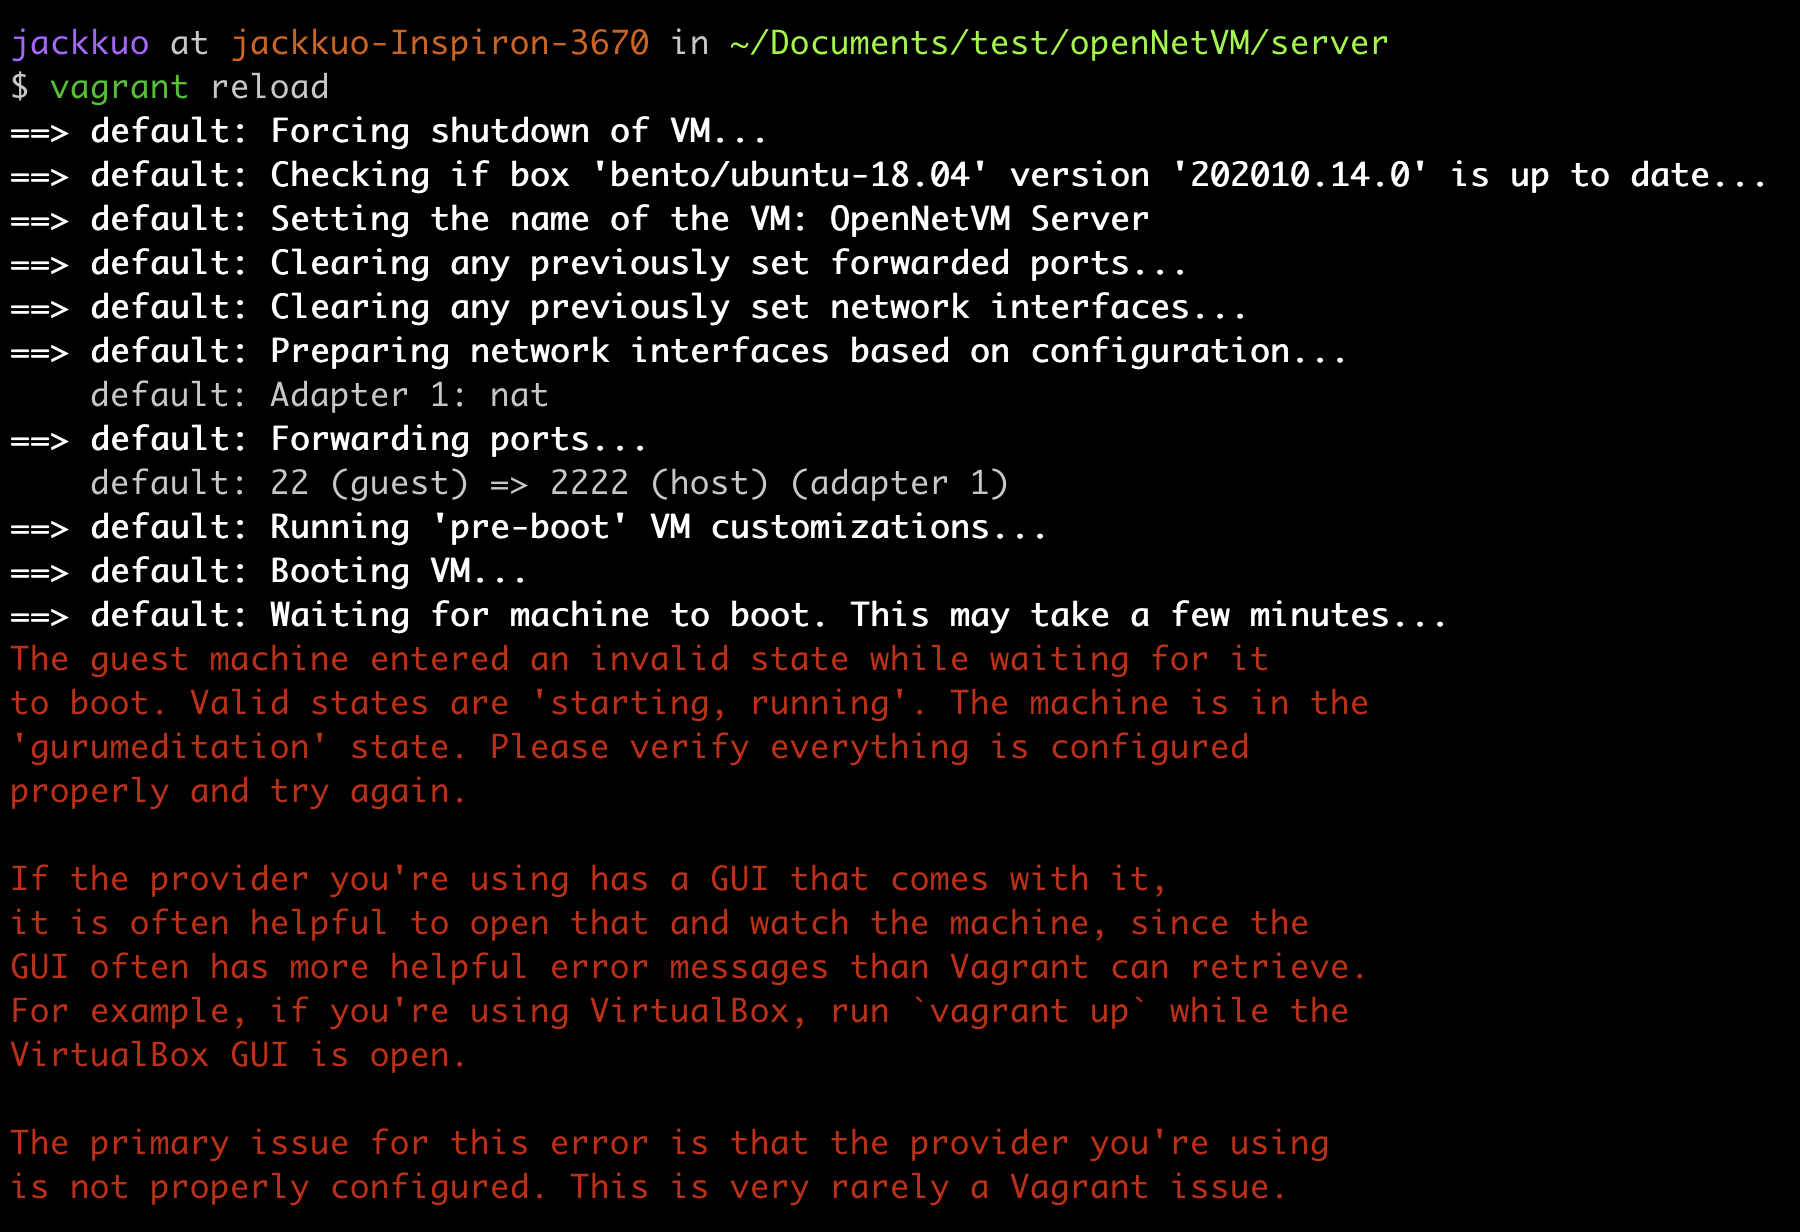
當執行 Vagrant 時遇到下面問題,是因為 VT-x 目前正在被其他的 hypervisor 使用
The guest machine entered an invalid state while waiting for it to boot. Valid states are ‘starting, running’. The machine is in the ‘gurumeditation’ state. Please verify everything is configured properly and try again
解法:
找到使用到的程式將其關閉,例如 KVM/QEMU 就會使用 VT-d。
參考資料
comments powered by Disqus